Version control with Git
Contents
Version control with Git
Introduction
Version control, also known as revision control or source control, is the management and tracking of changes to computer code and other certain other types of data in an automated way.
Any project (collections of files in directories) under version control has changes and additions/deletions to its files and directories recorded and archived over time so that you can recall specific versions later.
Version control is in fact the technology embedded in the versioning of various word processor and spreadsheet applications (e.g., Google Docs, Overleaf).
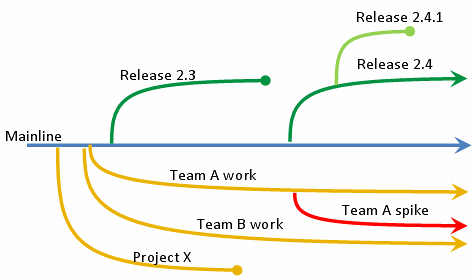
Fig. 6 An overview of how version control works. Some of the project mainline’s branches may eventually be merged back into the mainline if they are successful in achieving some objective that is worth integrating into the mainline.
Why Version Control?
With version control of biological computing projects, you can:
record all changes made to a set of files and directories, including text (usually ASCII) data files, so that you can access any previous version of the files
“roll back” data, code, documents that are in plain text format (other file formats can also be versioned; see section on binary files below).
collaborate more easily with others on developing new code or writing documents – branch (and merge) projects
back up your project (but git is not a backup software - see sections on binary and large files below).
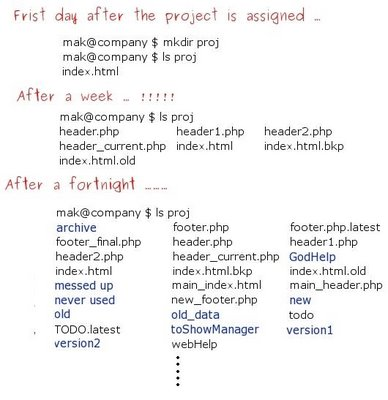
Fig. 7 This will very likely happen if you don’t use Version Control.
(Source: maktoons.blogspot.com).
git
We will use git, developed by Linus Torvalds, the “Linu” in Linux. This is currently the most popular tool for version control.
In git, each user stores a complete local copy of the project, including the history and all versions. So you do not rely as much on a centralized (remote) server. First, install and configure git:
sudo apt-get install git
git config --global user.name "Your Name"
git config --global user.email "your.login@imperial.ac.uk"
git config --list
git workflow
Here is a graphical outline of the git workflow and command structure:
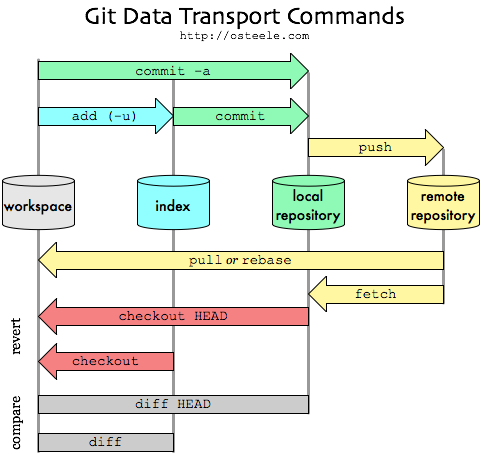
Fig. 8 The git workflow and command structure..
Note that only when you push or fetch do you need an internet connection, because before that you are only archiving in a local (hidden) repository (that sits in a hidden .git directory within your project).
Basic git commands
Here are some fundamentally important git commands (please make sure you read more about them):
Command |
What it does |
|---|---|
|
Initialize a new repository |
|
Download a repository from a remote server |
|
Show the current status |
|
Show differences between commits |
|
Blame somebody for the changes! |
|
Show commit history |
|
Commit changes to current branch |
|
Show branches |
|
Create new branch |
|
Switch to a different commit/branch called |
|
Gather commits info from a remote branch to your current local branch without merging them |
|
Merge two or more versions of one or more files |
|
Upload from remote repository (this is effectively the same as |
|
Send changes to remote repository |
There are more git commands which you will also learn, but it is important that you familiarize yourself with these ones in particular first.
Your first repository
Time to bring your computing coursework directory under version control. For example on Linux,
cd ~/Documents/CMEECourseWork
Then initialize your local git repository:
git init
Initialised empty Git repository in /home/mhasoba/Documents/CMEECourseWork/.git/
Create your README file (as a markdown document, so with the .md extension):
echo "My CMEE Coursework Repository" > README.md
Check your git configuration:
git config --list
user.email=mhasoba@gmail.com
user.name=Samraat Pawar
push.default=simple
core.repositoryformatversion=0
core.filemode=true
core.bare=false
core.logallrefupdates=true
Check the files and directories that have been created; note the hidden .git directory:
ls -al
total 20
drwxrwxr-x  4 mhasoba mhasoba 4096 Oct 13 14:38 .
drwxr-xr-x 34 mhasoba mhasoba 4096 Oct 13 14:37 ..
drwxrwxr-x  7 mhasoba mhasoba 4096 Oct 13 14:38 .git
-rw-rw-r--  1 mhasoba mhasoba   30 Oct 13 14:38 README.md
drwxrwxr-x  6 mhasoba mhasoba 4096 Oct 13 14:37 week1
Add the README (AKA “stage” it for for a git commit):
git add README.md
Check the current status of your repository:
git status
On branch master

No commits yet

Changes to be committed:
  (use "git rm --cached <file>..." to unstage)
	new file:   README.md

Untracked files:
  (use "git add <file>..." to include in what will be committed)
	week1/
This tells you that there are local changes that need to be committed.
git commit -m "Added README file."
[master (root-commit) c04bc3a] Added README file.
 1 file changed, 1 insertion(+)
 create mode 100644 README.md
You can also combine flags like in other UNIX comamnds; so you can both, add (-a flag) and commit (-m flag) at one go, with -am.
Check status again:
git status
On branch master
Untracked files:
  (use "git add <file>..." to include in what will be committed)
	week1/

nothing added to commit but untracked files present (use "git add" to track)
What does it say now?
You can also add changes matching a particular pattern: for example
git add *.txt
git status
On branch master
Changes to be committed:
  (use "git restore --staged <file>..." to unstage)
	new file:   week1/data/spawannxs.txt
	new file:   week1/sandbox/TestFind/Dir1/Dir11/Dir111/File111.txt
	new file:   week1/sandbox/TestFind/Dir1/File1.txt
	new file:   week1/sandbox/TestFind/Dir2/File2.txt
	new file:   week1/sandbox/TestFind/Dir3/File3.txt
	new file:   week1/sandbox/TestWild/Anotherfile.txt
	new file:   week1/sandbox/TestWild/File1.txt
	new file:   week1/sandbox/TestWild/File2.txt
	new file:   week1/sandbox/TestWild/File3.txt
	new file:   week1/sandbox/TestWild/File4.txt
	new file:   week1/sandbox/test.txt
Note that this adds ALL changes that match the pattern, recursively (through all sub-directories).
Next you can commit the rest of these files inside week 1 with another message, just like you did for readme above:
Warning
Before making your first commit, please read the section about “Ignoring files” below.
git commit -m "Full first commit of new project"
[master 2e5ab91] Full first commit of new project
 20 files changed, 599 insertions(+)
 create mode 100644 week1/data/spawannxs.txt
 create mode 100644 week1/sandbox/TestFind/Dir1/Dir11/Dir111/File111.txt
 create mode 100644 week1/sandbox/TestFind/Dir1/File1.csv
 create mode 100644 week1/sandbox/TestFind/Dir1/File1.tex
 create mode 100644 week1/sandbox/TestFind/Dir1/File1.txt
 create mode 100644 week1/sandbox/TestFind/Dir2/File2.tex
 create mode 100644 week1/sandbox/TestFind/Dir2/File2.txt
 create mode 100644 week1/sandbox/TestFind/Dir2/file2.csv
 create mode 100644 week1/sandbox/TestFind/Dir3/File3.txt
 create mode 100644 week1/sandbox/TestWild/Anotherfile.csv
 create mode 100644 week1/sandbox/TestWild/Anotherfile.txt
 create mode 100644 week1/sandbox/TestWild/File1.csv
 create mode 100644 week1/sandbox/TestWild/File1.txt
 create mode 100644 week1/sandbox/TestWild/File2.csv
 create mode 100644 week1/sandbox/TestWild/File2.txt
 create mode 100644 week1/sandbox/TestWild/File3.csv
 create mode 100644 week1/sandbox/TestWild/File3.txt
 create mode 100644 week1/sandbox/TestWild/File4.csv
 create mode 100644 week1/sandbox/TestWild/File4.txt
 create mode 100644 week1/sandbox/test.txt
git status
On branch master
nothing to commit, working tree clean

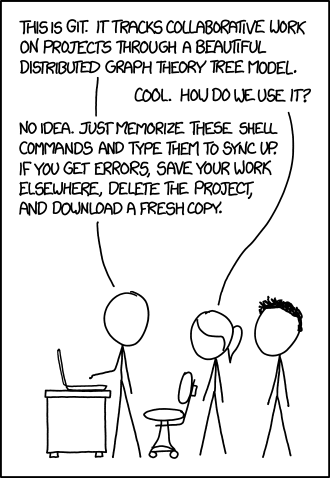
Fig. 9 Make meaningful comments in your git commit. Please don’t neglect to make each commit message meaningful. And use this mantra: “commit often, comment always”. The correct meaning of “often” in this context comes with experience.
(Source: XKCD)
Nothing has been sent to the remote server yet (see below for more on the remote server).
So let’s go to your online git service (e.g., github or bitbucket) and set up. Note that github and bitbucket both give you unlimited free private repositories if you register with an academic email. Not a big deal if you will not be writing private code, handy if you are (can you think of examples when you would need to write private code?).
So let’s proceed with connecting your local git repository to your remote server:
Login to your github or bitbucket account
Set up your
ssh-based access. SSH (SecureSocket Shell) is a protocol that allows you to connect to and interact with remote servers. Here are two sets of guidelines (you can use whichever seems easier to you, irrespective of whether you are using githib or bitbucket):Next, create a new repository on your remote service with the same name as your local project (e.g.,
CMEECourseWork), and push your new project to this newly created remote git repository. Instructions for this step are here:
Note that you have already done the git init step, so no need to repeat those bits.
You are done. Now you can really start to use git!
The first step after having created your remote repository and added your ssh key to it, is to link the remote to your local repo (as the instructions in web pages linked above will already have told you):
git remote add origin git@github.com:mhasoba/CMEECourseWork.git
And then,
git remote -v
No you can git push all your local commits:
git push origin master
This pushes the (committed) changes in your local repository up to the remote repository you specified as the origin. Note that master refers to the branch (you currently only have one). More on branching below.
You can rename your remote origin to a more meaningful name, (e.g., github_CMEECourseWork) using the git remote rename command. See this.
The README file
A README (like the README.md that you created in your git repo above) is a text file that introduces and explains a project. It contains information that is required to understand what the project is about and how to use or run it.
While READMEs can be written in any text file format, Markdown (saved as an .md file) is most commonly used, as it allows you to add simple text formatting easily. Two other formats that you might most often see are plain text and reStructuredText (saved as an .rst file, common in Python projects).
You can find many README file suggestions (and templates) online. Essentially, it should ideally have the following features/content:
Project name / title
Brief description: what your project does and/or is for. Provide context and add links to any references to help new visitors.
Languages: List language(s) and their versions used in the project
Dependencies: What special packages (which are not part of standard libraries of the language(s) used) might be needed for a new user to run your project
Installation: Guidelines for installing the project (if applicable), including dependencies.
Project structure and Usage: How the project is structured and how to run/use it. Explain, if relevant, what specific files do. No need to list every file, such as data or experimental ones (like the ones in
sandbox).Author name and contact
In addition, you may want to include(but not necessary for your current coursework), License, Acknowledgments, and instructions for Contributing.
Ignoring Files
You will have some files you don’t want to track (log files, temporary files, executables, etc). You can ignore entire classes of files with .gitignore.
\(\star\) Let’s try it (make sure you are in your coursework directory (e.g., CMEECourseWork)):
echo -e "*~ \n*.tmp" > .gitignore
cat .gitignore
*~
*.tmp
git add .gitignore
touch temporary.tmp
Then,
git add *
You can also create a global gitignore file that lists rules for files to be ignored in every Git repository on your computer.
Tip
Templates for .gitignore: You can find standard .gitignore templates online. For example, search for “.gitignore templates”.
Directory and file patterns for gitignoring
It’s important that you use the correct patterns for what to ignore in your .gitignore, to make sure that all the correct directories and files are being excluded. Note that you can put additonal .gitignore files in sub-directories if you need more fine-grained control over what is to be ignored, bt it is not necessary, because git-ignoring works recursively (including thorugh sub-directories) as long as you include the correct pattern.
Here are the basic patterns (rules) :
Pattern |
gitignore result |
|---|---|
|
This is a comment - this gitignore entry will be ignored (avoid having any file or directory with |
|
Every file OR directory (because lack of trailing |
|
Every directory (due to the trailing |
|
Every file OR directory named |
|
Every directory named target in the top-most directory (because of the leading and trailing |
|
Every file or directory ending with the extension |
|
Every file or directory ending in |
There are additonal patterns - please see the Readings and Resources section.
.gitignore-ng after commit-ing
If you find that a file or directory belonging to a pattern that you incuded in your .gitignore fails to be ignored (still comes under version control), it most likely means that you gitignored it AFTER committing and pushing it. In this scenario, you need to use
git rm --cached <file>
for a file, and
git rm -r --cached <folder>
for a directory.
While these commands will not remove the physical file from your local repository, it will remove the files from other locals on their next git pull.
General good practice for gitignoring
When writing a gitignore it is best to ignore any file that does not contain plaintext code. This type of file is what git was designed for!
If you do need to include a small csv file, image, or output (such as when creating reports or including test data) it is a good idea to do this using exceptions (aka the ! symbol)
For example the following gitignore file would ignore ALL csv files except for pushabledata.csv
*.csv
!pushabledata.csv
As git reads gitignore files top-to-bottom and can overwrite contradicticting rules with others, it is important to make sure that these are in the correct order.
Whitelist principle
Gitignore files are usually used as a blacklist: where anything you add to your git repository is allowed unless you specifically outlaw it in the gitignore.
An alternative, safer technique (though one which is definitely more work to maintain) is a whitelist-based approach.
To do this, you firstly ignore every file with the pattern *.* and then explicitly allow files and file types that you know you want. For example:
*.*
!.gitignore
!*.R
!*.py
!*.sh
!*.tex
!*.bib
!Week1/results/myfirstlatexdoc.tex
This is not necessarily a better or worse way to do things, you are in the end trading your time and effort for increased safety and cleanliness of your repository.
Dealing with binary files
A binary file is computer-readable but not human-readable, that is, it cannot be read by opening them in a text viewer. Examples of binary files include compiled executables, zip files, images, word documents and videos. In contrast, text files are stored in a form (usually ASCII) that is human-readable by opening in a text reader (e.g., gedit). Without some git extensions and configurations (coming up next), binary files cannot be properly version-controlled because each version of the entire file is saved as is in a hidden directory in the repository (.git).
However, with some more effort, git can be made to work for binary formats like *.docx or image formats such as *.jpeg, but it is harder to compare versions; have a look at this and this1, and also, this
Dealing with large files
As such, git was designed for version control of workflows and software projects, not large files (say, >100mb) (which may be plain-text or binary). Binary files are particularly problematic because each version of the file is saved as is in .git, when you have a large number of versions it means that there are the same number of binary files in the hidden directory (for example 100 \(\times\) >100mb files!).
So please do not keep large files (especially binary files) under version control2. For example, if you are doing GIS work, you may have to handle large raster image files. Do not bring such files under version control. We suggest that you include files larger than some size in your .gitignore. For example, you can use the following bash command:
find . -size +100M | cat >> .gitignore
The 100M means 100 mb – you can reset it to whatever you want.
Then what about code that needs large files? For this, the best approach is write code that scales up with data size. If it works on a 1 mb file, it should also work on a 1000 mb file! If you have written such code, then you can include a smaller file as a MWE (minimum working example).
And how do you back up your large data files? Remember, version control software like git are not meant for backing up data. The solution is to back up separately, either to an external hard drive or a cloud service. rsync is a great Linux utility for making such backups. Google it!
You may also explore alternatives such as git-annex (e.g., see this), and git-lfs (e.g., see this).
Tip
Checking size of your git repo: You have two options in Linux/UNIX to check the size of your git repo. You can use (cd to your repo first) du -sh .git, or for more detailed information about what’s using the space, use git count-objects -vH (this will work across platforms as this is a git command).
Removing files
To remove a file (i.e. stop version controlling it) use git rm:
echo "Text in a file to remove" > FileToRem.txt
git add FileToRem.txt
git commit -am "added a new file that we'll remove later"
[master 706f40d] added a new file that we'll remove later
 2 files changed, 3 insertions(+)
 create mode 100644 .gitignore
 create mode 100644 FileToRem.txt
git rm FileToRem.txt
rm 'FileToRem.txt'
git commit -am "removed the file"
[master 284c62e] removed the file
 1 file changed, 1 deletion(-)
 delete mode 100644 FileToRem.txt
I typically just make all my changes and then just use git add -A for the whole directory (and it’s subdirectories; -A is recursive).
Un-tracking files
.gitignore will prevent untracked files from being added to the set of files tracked by git. However, git will continue to track any files that are already being tracked. To stop tracking a file you need to remove it from the index. This can be achieved with this command.
git rm --cached <file>
The removal of the file from the head revision will happen on the next commit.
Accessing history of the repository
To see particular changes introduced, read the repo’s log :
git log
For a more detailed version, add -p at the end.
Reverting to a previous version
If things go horribly wrong with new changes, you can revert to the previous, “pristine” state:
git reset --hard
git commit -am "returned to previous state" #Note I used -am here
If instead you want to move back in time (temporarily), first find the “hash” for the commit you want to revert to, and then check-out:
git status
And then,
git log
Then, you can
git checkout *version number*
e.g, git checkout 95f7d0
Now you can play around. However, if you do want to commit changes, you create a “branch” (see below). To go back to the future, type
git checkout master
Branching
Imagine you want to try something out, but you are not sure it will work well. For example, say you want to rewrite the Introduction of your paper, using a different angle, or you want to see whether switching to a library for a piece of code improves speed. What you then need is branching, which creates a project copy in which you can experiment:
git branch anexperiment
git branch
git checkout anexperiment
git branch
echo "Do I like this better?" >> README.txt
git commit -am "Testing experimental branch"
If you decide to merge the new branch after modifying it:
git checkout master
git merge anexperiment
cat README.txt
Unless there are conflicts, i.e., some other files that you changed locally had diverged from those files in the Master in the meantime (due to new changes pushed by another collaborator), you are done, and you can delete the branch:
git branch -d anexperiment
If instead you are not satisfied with the result, and you want to abandon the branch:
git branch -D anexperiment
When you want to test something out, always branch! Reverting changes, especially in code, is typically painful. Merging can be tricky, especially if multiple people have simultaneously worked on a particular document. In the worst-case scenario, you may want to delete the local copy and re-clone the remote repository.
Running git commands on a different directory
Since git version 1.8.5, you can run git directly on a different directory than the current one using absolute or relative paths. For example, using a relative path, you can do:
git -C ../SomeDir/ status
Tip
Cloning the MulQuaBio repository: You can clone the master repository of this book on your computer and regularly git pull it to keep it updated. That way the these notes and the associated code and data files are easily and locally available on your computer. DO NOT clone the repository into your own coursework repository though!
Running git commands on multiple repositories at once
For git pulling in multiple subdirectories (each a separate repository), here is an example:
find . -mindepth 1 -maxdepth 1 -type d -print -exec git -C {} pull \;
Breaking down these commands one by one,
find . searches the current directory
-type d finds directories, not files
-mindepth 1 sets min search depth to one sub-directory
-maxdepth 1 sets max search depth to one sub-directory
-exec git -C {} pull \ runs a custom git command one on every git repo found
Using git through a GUI
There are many nice git GUI’s (Graphical User Interfaces) out there, such as gitKraken. Or if you are using a code editor like Visual Studio Code, there are nice extensions that will give you considerable GUI functionality.
Tip
Checking git status: Always run the git statuscommand on a repository before pulling/fetching from, or pushing to a remote repository!
A friendly concluding note on git
Git can feel hard and unintuitive. It is likely that at some point you will make a mistake and lose some work as a consequence.
THIS IS NORMAL
Don’t worry about it, this has happened to pretty much everyone who has ever used git.
When things like this do happen though, it is imperative that you work out what went wrong so you can make sure it doesn’t happen again.
Questions to ask yourself include:
Did I use
git statusto check what I was adding?Did I commit regularly enough, whenever I had completed a logical section of work?
Did I make sure to only commit code rather than committing data files and outputs too?
Did I make sure to gitignore the things I needed to?
When you get used to working with git, it becomes as natural as juggling chainsaws: i.e. it will always feel a bit odd and strange but it won’t be as scary as it once was.
Practicals
Instructions
Don’t modify anything (or refer to any files) in your local copy of the git repository of these notes (on Github). Copy whatever you need from the master repository to your own repository.
Git commit and push every time you do some significant amount of coding work (after testing it), and then again before the given deadline (this will be announced in class). This includes UnixPrac1.txt from the Unix Chapter.
Push your git repository
The only practical submission for git is pushing your coursework git repository,
.gitignoreandreadmefiles included. Make sure your.gitignorehas meaningful exclusions, and yourreadmehas useful information (as explained in the section above). Also search online “readme good practices” or something like that to find additional tips/info.Also, invite your assessor to your coursework repository (e.g,
CMEECourseWork) repository with write privileges (AKA push privilege in GitHub). The current assessor is s.pawar@imperial.ac.uk (or “mhasoba” on both bitbucket and github).
Readings & Resources
General
Excellent book on Git: http://git-scm.com/book
Look up the Bitbucket Git resources
Really great git tutorials: https://try.github.io
Markdown
A cheatsheet for github-flavored Markdown: https://github.com/adam-p/markdown-here/wiki/Markdown-Cheatsheet
Committing practices
Some tips for good commit practices: https://chris.beams.io/posts/git-commit/
.gitignore
Guidelines for the
.gitignorefile: https://labs.consol.de/development/git/2017/02/22/gitignore.html, https://docs.github.com/en/free-pro-team@latest/github/using-git/ignoring-files
Branching
Guidelines for brancing: https://gist.github.com/digitaljhelms/4287848
Footnotes
1: There you will find the following phrase: “…one of the most annoying problems known to humanity: version-controlling Microsoft Word documents.”. LOL!
2: None of the computing weeks assessments will require you to use such large files anyway