UNIX and Linux
Contents
UNIX and Linux
The time has come,’ the Walrus said, To talk of many things: Of shoes — and ships — and sealing-wax — Of cabbages — and kings — And why the sea is boiling hot — And whether pigs have wings.’
—Lewis Carroll
Introduction
Here we are going to learn about the UNIX operating system, and in particular, it’s most popular user-friendly avatar, Linux (and even more specifically, Debian based Linux distributions, with focus on Ubuntu). If you are not a Unix/Linux user, you still need to learn the UNIX environment because under the hood, all other operating systems that need to do serious computing have to use Unix. Indeed, MacOS is built on UNIX, and Windows now a days has a UNIX sub-system to enable users to things that can only really be done in UNIX (like Genomics!).
What is UNIX?
UNIX is a machine-independent operating system (OS) developed in the 1970s by AT&T programmers (notably Brian Kernighan and Dennis Ritchie, fathers of C) for programmers (you!). It is multi-user and network-oriented by design, uses plain text files for storing data (no proprietary file formats), and has a strictly hierarchical directory structure (more on this below). This makes it an ideal environment for developing your code and storing your data.
Linux and Mac OS are Unix-like (or UN*X or *nix) operating systems that have evolved from UNIX. Ubuntu is a Linux distribution.
Why UNIX?
It was designed for developing code and storing data – an ideal native habitat for programming languages like Python and R
Robust, stable, secure (very few UNIX viruses and malware – I am yet to encounter one after almost 15 years!)
Its free and open-source
Scores of small programs available to perform simple tasks – can be combined easily
Easy to automate tasks (e.g., using shell scripts)
Multi-user (multiple users can log in and concurrently use computer)
Multi-tasking (can perform many tasks at the same time)
Network-ready (easy to communicate between computers)
Amazing support – a large body of tutorials and support web sites are readily available online
Basically all resources for High-Performance Computing (computer clusters, large workstations, etc.) run a UNIX or Linux operating system
UNIX has been around since the early 1970’s and will likely be around at the end of your career (the hard work you are putting into learning UNIX will pay off over a lifetime!)
Note
32-bit vs 64-bit: The terms 32-bit and 64-bit refer to the way a computer’s processor (also called a CPU), handles information. A 64-bit OS handles large amounts of random access memory (RAM) more effectively than a 32-bit system. Specifically, while 32 bits of information can only access 4 GB of RAM, a 64-bit machine can access essentially unlimited system memory (though this is not yet physically possible)! The combination of your operating system, and processor bit count is often called the “Platform”.
UNIX directory structure
The key UNIX directories are:
Directory |
Description |
|---|---|
|
Is the “root” directory |
|
Contains basic programs |
|
Contains configuration files |
|
Contains files connecting to devices (keyboard, mouse, screen, etc.) |
|
Your home directory; this is where all your documents are and where you will usually work |
|
Contains temporary files |
This hierarchical directory structure makes navigating your computer from the terminal/shell (coming up next!) or encoding this navigation in your computer programs easier.
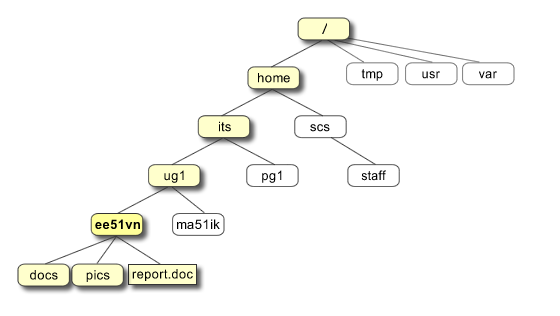
Fig. 3 UNIX directory structure. The UNIX directory (same as “Folder”) structure is hierarchical, with a single tree starting from the “root” /. This is quite unlike Windows or MS-DOS, where there are separate trees for disk partitions, removable media, network, etc.
(Source: https://pathanruet.files.wordpress.com/2012/05/unix-tree.png)
Meet the UNIX shell
The shell (or terminal) is a text command processor that can run commands to interface with the Operating System’s “kernel” – the core software that “talks” to the harware, including the CPU, RAM and hard drive. We will use the popular (yes, it’s very popular in the new universe you are entering!) bash shell.
Note
bash stand for the “Bourne Again Shell”, a pun (“born again” oh, us geeks!) on the name of the original Bourne shell (sh) that it replaces.
\(\star\) To launch a bash shell, do Ctrl + Alt + t (or use Meta key) – try it now. (On Mac: Cmd+Space to open spotlight search, and type “terminal” and hit return).
Warning
In Mac OS, the default shell will likely be zsh shell, assuming you are using one of the newer versions of the operating system. Most of the commands will be the same between these shells, but some may differ (look out for tips about this, and also read this).
OK, so you have met the shell. Isn’t it lovely?
Let’s look at key features of the bash shell/terminal:
The shell, by default, automatically starts in your home directory
/home/yourname/The start of the command prompt, where you will type your commands is indicated by a
:~$)The text before the
:~$tells you what the name of the current user is (the part before the@), and the name of the computer (the part after the@upto the:~$).
Tip
The path /home/yourname/ can be replaced with shorthand ~ (important to remember!). So, for example, the command cd /home/yourname/Documents is the same as the command cd ~/Documents
Some useful keyboard shortcuts that work in the bash terminal are:
Command |
What it means |
|---|---|
|
Go to the beginning of the line |
|
Go to the end of the line |
|
Clear the screen |
|
Clear the line before cursor position |
|
Clear the line after the cursor |
|
Kill whatever you are running |
|
Exit (close) the current shell |
|
Move cursor forward one whole word |
|
Move cursor backward one whole word |
Also, note that:
Use the
Tabkey – very handy (trylswith a doubleTabTab).You can navigate commands you previously typed using the up/down arrows
Special Characters
Certain “special” characters have a particular meaning (and use) to the UNIX shell. The forward slash / that separates parts of file/ directory paths, and the tilde ~ that serves as a shorthand for your home directory path are two examples that you have already seen.
The following table gives the meanings of important (not all) special characters in shell command lines that you should know about (we will see more or different special characters as we go through the Shell scripting and Python chapters):
Special character |
Meaning |
|---|---|
|
Home directory path |
|
Path names separator |
|
Comment (anything after this will be ignored by the shell interpreter; in fact, this serves the same purpose across shell scripts, |
|
Variable, expression or command to follow this |
|
Start and end of an expression or command block |
|
Wildcard for strings; for example, |
|
Single-character wildcard |
|
Escape character; any character following this will be quoted; for example, |
|
Command separator; commands can be entered sequentially in a single command line separated by this |
` |
` |
|
Redirect output to (any valid) target following this |
|
Pipeline logical NOT |
Basic UNIX commands
Here are some basic commands, many of which you will use frequently.
Command |
What it does |
|---|---|
|
Show help page of a command. |
|
Display your user-name. |
|
Show the current directory. |
|
List the files in the directory. |
|
Change directory. |
|
Move one directory up. |
|
Go to the root directory. |
|
Go to the home directory. |
|
Copy a file, or a directory non-recursively (what’s this? Google it!). |
|
Copy a directory recursively (what’s this? Google it!). |
|
Move or rename a file or directory. |
|
Create an empty file. |
|
Print a string (in this example, “My string”). |
|
Remove a file or directory non-recursively. |
|
Remove a directory recursively. |
|
Count the number of lines and words in a file. |
|
Sort the lines of a file and print result. |
|
Shows only unique elements of a list. |
|
Print the file on the screen. |
|
Progressively print a file on the screen (“q” to exit). |
|
Print the first few lines of a file. |
|
Print the last few lines of a file. |
|
Show the last commands you typed. |
|
Print current date. |
|
Determine the type of a file. |
|
Change user password. |
|
Change file permissions. |
Exploring files and directories
A fundamental command that you will probably use the most frequently of all is ls (this stands for list files and directories in current directory).
\(\star\) Type the ls command in at the command prompt (which will have opened in your home directory) and hit Enter.
You will see a number of directories and maybe some files in the output (this is currently what you have in your user account’s home).
\(\star\) Next try ls /
This will list what you have in your root, including the directories listed in the table above .
\(\star\) The ls command by default does not list hidden directories and files. To see these, use
ls -a
This will list all files and directories that start with a ., such as .config (this contains sub-directories and files containing the configuration settings for applications).
\(\star\) To see more info on the files and directories, use
ls -l
And if you want to see detailed info on ALL files and directories including hidden ones, combine the -a and -l flags:
ls -al
An example line in the output of ls -l is:
drwxr-xr-x 9 mhasoba mhasoba 4096 Oct 11 10:45 Desktop
This is what all that text preceding the folder name (in his case, Desktop) means (you will get similar info for files):
Item type and permissions (
drwxr-xr-x)The first letter is
dbecause this is a directory. This will most often bed(directory),-(file), orl(a symbolic link – a file that contains a reference to another file or directory, similar to a “shortcut” in Windows OS).Following this, there are three triplets of letters (
rwx,r-x,r-x), with each letter in each of the three indicating read, write and execute permissions for the owner, the group, and anybody else.The first,
rwx, indicates that the owner (mhasoba, see below) has read (r), write (w) and execute (x) permissions for the Desktop directoryThe second and third
r-xmean that the group and everybody else have read and execute but not write permission (they can view the Desktop, but not modify anything in it)
Number of links or directories inside this directory (
9) (for files this value would be 1)Who owns it (user
mhasoba),The owner’s group (also
mhasoba; on this machine the root is the (single) usermhasoba),File size in bytes (
4096),Time of last modification (
Oct 11 10:45), andFile/directory name (
Desktop)
Building your coursework directory structure
It is time to start building your CMEE coursework directory structure. Please follow these rules:
Do all your work in a single directory with the abbreviation of your course followed by
CourseWork(no spaces please) located in a suitable place in your/home. So for example, for CMEE students, the directory would beCMEECourseWork.Each week’s coursework should be in its respective directory; e.g.,
CMEECourseWork/week1,CMEECourseWork/week2, etc.Each week’s directory should contain directories called
code,data,results, andsandbox(can be all small(like in these example names), sentence (first letter capitalized), or all large case, but be consistent)
You will bring your CMEECourseWork and all it’s contents under version control using Git (coming up in the Version Control Chapter.
\(\star\) OK, make your coursework directory now. First, cd to an appropriate place (e.g., Documents on your home):
cd ~/Documents # same as /home/YourUserName/Documents
Check what you have in there with:
ls
(You should see the contents of your Documents directory)
Now make the directory and cd to it
mkdir CMEECourseWork
You will get an error if a directory by that name already exists.
cd CMEECourseWork
You can also combine commands using &&. For example,
cd CMEECourseWork && cd CMEECourseWork
Next, create your week1 sub-directory:
mkdir week1
cd week1
mkdir sandbox code data results
Then, try to cd to it:
cd Sandbox
You will get bash: cd: Sandbox: No such file or directory error, because in the UNIX/Linux file system, commands are case-sensitive. So “Sandbox” is not the same as “sandbox”.
Warning
Mac OS has case insensitive commands: Unlike UNIX/Linux, MacOS allows execution of commands and file/directory names in a case-insensitive way. Keep this in mind from the perspective of platform independence - if you write your code to call a directory called, say, Sandbox, but the directory is actually called sandbox, then you will not get an error, but your collaborator (me!) will, if she/he uses Linux!
Next, try and remove sandbox:
rm sandbox
You will get a rm: cannot remove 'sandbox': Is a directory error because UNIX is conservative about allowing users to delete directories (this is one of the reasons why it is so stable). To delete it, you will need to use the -r (for recursive) flag:
rm -r sandbox
Careful with the -r option, because starting with the target directory (sandbox in this case), it recursively removes the entire directory tree inside the target directory, files and all!
Now recreate your sandbox:
mkdir sandbox
Let’s try renaming it:
mv sandbox Sandbox
ls
code data results Sandbox
Let’s move back to all small caps sandbox for naming consistency:
mv Sandbox sandbox
ls
code data results sandbox
Next try some more directory and file manipulations:
cd sandbox
Try pwd (print working directory) next to see the full path of the current directory.
Let’s continue:
ls # nothing here yet
Note the hash mark (#) after the command above – anything after a # is ignored (so you can use it for commenting).
touch TestFile # OR, "touch TestFile.txt"
ls
TestFile
mv TestFile TestFile2; ls # commands can also be sequentially executed with a `;`
TestFile2
rm TestFile2
You could have made your project directories and subdirectories in one swoop by using the -p option of mkdir (cd back up to CMEECourseWork first) with the -p flag for mkdir:
mkdir -p Week1/{Data,Code,Results,Sandbox}
How would you cd to CMEECourseWork?
There are two reasonable options:
cd ../../../CMEECourseWork
Or,
cd /home/YourUserName/Documents/CMEECourseWork
Try them both.
Which is the same as cd ~/Documents/CMEECourseWork
Which of these two would you choose and why?
Command arguments
Most UNIX commands accept arguments that modify their behavior. E.g., ls -l (ls “minus”l) lists the files in longer format. Some useful arguments:
Command/Argument |
What it does |
|---|---|
|
Copy a directory recursively (i.e., including all the sub-directories and files). |
|
Removes a file, but asks first (for safety). |
|
Remove a directory recursively (i.e., including all the sub-directories and files). |
|
List all files, including hidden ones. |
|
List all files, with human-readable sizes (Mb, Gb). |
|
List all files, long format. |
|
List all files, order by size. |
|
List all files, order by modification time. |
|
List all files, one file per line. |
|
Create the directory Dir3 and Dir1 and Dir2 if they do not already exist. |
|
Sort all the lines, but use numeric values instead of dictionary (i.e., 11 follows 2). |
You can also combine command arguments / flags. Try:
cd ../../ # cd two directory levels higher, assuming you are currently in CMEECourseWork/Week1/sandbox
ls -R
.:
week1

./week1:
code  data  results  sandbox

./week1/code:

./week1/data:

./week1/results:

./week1/sandbox:
-R flag lists directory tree recursively (through all subdirectories)
ls -lR # same as ls -l -R
.:
total 4
drwxrwxr-x 6 mhasoba mhasoba 4096 Oct  5 12:00 week1

./week1:
total 16
drwxrwxr-x 2 mhasoba mhasoba 4096 Oct  5 12:00 code
drwxrwxr-x 2 mhasoba mhasoba 4096 Oct  5 12:00 data
drwxrwxr-x 2 mhasoba mhasoba 4096 Oct  5 12:00 results
drwxrwxr-x 2 mhasoba mhasoba 4096 Oct  5 12:00 sandbox

./week1/code:
total 0

./week1/data:
total 0

./week1/results:
total 0

./week1/sandbox:
total 0
The combines -l and -R to give you both the directory permissions info and when it was modfied while listing the directories and files recursively.
Redirection and pipes
Output of programs can also be “redirected” to a file in two ways:
>: Redirect output from a command to a file on disk. If the file already exists, it will be overwritten.>>: Append the output from a command to a file on disk. If the file does not exist, it will be created.
Let’s try some examples.
First make sure you are back in sandbox:
cd week1/sandbox
echo "My first line." > test.txt
cat test.txt
My first line.
echo "My second line" >> test.txt
cat test.txt
My first line.
My second line
Now try
ls / >> ListRootDir.txt
cat ListRootDir.txt
What do you see? Cool!
We can also concatenate commands using “pipes” with “|” e.g., to count how many files are in root (/) directory:
ls / | wc -l
How many is that?
Look up man wc in the terminal, or search “unix wc” online.
Or try:
ls -lt | head -5
total 4
-rw-rw-r-- 1 mhasoba mhasoba 30 Oct  5 12:01 test.txt
What does this do?
Wildcards
We can use wildcards to find files based on their names (still in Week1/Sandbox):
mkdir TestWild
cd TestWild
touch File1.txt
touch File2.txt
touch File3.txt
touch File4.txt
touch File1.csv
touch File2.csv
touch File3.csv
touch File4.csv
touch Anotherfile.csv
touch Anotherfile.txt
ls
ls | wc -l
Anotherfile.csv  File1.csv  File2.csv  File3.csv  File4.csv
Anotherfile.txt  File1.txt  File2.txt  File3.txt  File4.txt
10
We will use the following wildcards:
Wildcard |
Meaning |
|---|---|
|
Any single character, except a leading dot (hidden files). |
|
Zero or more characters, except a leading dot (hidden files). |
|
Define a class of characters (e.g., upper-case letters). |
Now let’s try to find the files using wildcards:
ls *
ls File*
ls *.txt
ls File?.txt
ls File[1-2].txt
ls File[!3].*
Anotherfile.csv  File1.csv  File2.csv  File3.csv  File4.csv
Anotherfile.txt  File1.txt  File2.txt  File3.txt  File4.txt
File1.csv  File2.csv  File3.csv  File4.csv
File1.txt  File2.txt  File3.txt  File4.txt
Anotherfile.txt  File1.txt  File2.txt  File3.txt  File4.txt
File1.txt  File2.txt  File3.txt  File4.txt
File1.txt  File2.txt
File1.csv  File1.txt  File2.csv  File2.txt  File4.csv  File4.txt
Using grep
grep is a command that matches strings in a file (why is this useful?). It is based on regular expressions (more on this later). Let’s explore some basic usage of grep. For a test file let’s download a list of protected species from the web (to sandbox):
cd ../ # move one level up from TestWild, back to sandbox
wget https://raw.githubusercontent.com/mhasoba/TheMulQuaBio/master/content/data/spawannxs.txt #Cool!
--2021-10-05 12:01:21--  https://raw.githubusercontent.com/mhasoba/TheMulQuaBio/master/content/data/spawannxs.txt
Resolving raw.githubusercontent.com (raw.githubusercontent.com)... 185.199.110.133, 185.199.111.133, 185.199.109.133, ...
Connecting to raw.githubusercontent.com (raw.githubusercontent.com)|185.199.110.133|:443... connected.
HTTP request sent, awaiting response... 200 OK
Length: 13467 (13K) [text/plain]
Saving to: ‘spawannxs.txt’

spawannxs.txt       100%[===================>]  13.15K  --.-KB/s    in 0.003s

2021-10-05 12:01:21 (5.03 MB/s) - ‘spawannxs.txt’ saved [13467/13467]
ls
spawannxs.txt test.txt TestWild
mv spawannxs.txt ../data # Move the file to the appropriate location (note the ../ - relative path)
cd ../data # Move to the data directory
head -n 50 spawannxs.txt #You will see "head" in R and Python as well
ANNEX I
List of Species of Marine and Coastal Flora
Protected Under Article 11(1)(a)

TRACHAEOPHYTA (Vascular Plants)

Family		Genus		Species

Aquifoliaceae	Ilex		cookii
Bignoniaceae	Crescentia	mirabilis
Bignoniaceae	Crescentia	portoricensis
Boraginaceae	Cordia		wagnerorum
Buxaceae	Buxus		vahlii
Cactaceae	Echinocereus 	reichenbachii var. albertii
Cactaceae	Harrisia	fragrans
Cactaceae	Harrisia	portoricensis
Cactaceae	Leptocereus	grantianus
Cactaceae	Leptocereus	wrightii
Cactaceae	Melocactus	guitartii
Cactaceae	Melocactus 	harlowii sensu lato
Cactaceae	Pilosocereus	deeringii
Cactaceae	Pilosocereus	robinii
Convolvulaceae	Bonamia		grandiflora
Convolvulaceae	Ipomoea		flavopurpurea
Convolvulaceae	Ipomoea		walpersiana
Cyatheaceae	Cyathea		dryopteroides
Cyperaceae	Rhynchospora	bucherorum
Dioscoreaceae	Rajania		theresensis
Ericaceae	Rhododendron	chapmanii
Euphorbiaceae	Andrachne	brittonii
Euphorbiaceae	Bernardia	venosa
Euphorbiaceae	Cnidoscolus	fragrans
Euphorbiaceae	Drypetes	triplinervia
Flacourtiaceae	Banaras		vanderbiltii
Flacourtiaceae	Samyda		microphylla
Hydrophyllaceae	Hydrolea	torroei
Icacinaceae	Ottoschulzia 	rhodoxylon
Leguminosae	Acacia		cupeyensis
(Fabaceae)
Leguminosae	Acacia		roigii
Leguminosae	Stahlia		monosperma
Liliaceae	Harperocallis	flava
Loranthaceae	Dendropemon	acutifolius
Malvaceae	Abutilon	virginianum
Meliaceae	Trichilia	triacantha
Olacaceae	Ximenia		roigii
Orchidaceae	Brachionidium	ciliolatum
Orchidaceae	Cranichis	ricartii
Orchidaceae	Lapanthes	eltoroensis
Orchidaceae	Oncidium	jacquinianum
OK, let’s look for falcons:
grep Falco spawannxs.txt
Falconidae	Falco		femoralis septentrionalis
Falconidae	Falco		peregrinus
Falconidae	Polyborus	plancus
Falconidae	Falco		columbarius
Nothing there? Let’s use -i to make the matching case-insensitive:
grep -i Falco spawannxs.txt
Order:	FALCONIFORMES
Falconidae	Falco		femoralis septentrionalis
Falconidae	Falco		peregrinus
Falconidae	Polyborus	plancus
Order:	FALCONIFORMES
Order:	FALCONIFORMES
Order:	FALCONIFORMES
Falconidae	Falco		columbarius
Now let’s find the beautiful “Ara” macaws:
grep -i ara spawannxs.txt
Flacourtiaceae	Banaras		vanderbiltii
Order:	CHARADRIIFORMES
Charadriidae	Charadrius	melodus
Psittacidae	Amazona		arausica
Psittacidae	Ara		macao
Dasyproctidae	Dasyprocta	guamara
Palmae		Syagrus (= Rhyticocos)	amara
Psittacidae	Ara		ararauna
Psittacidae	Ara		chloroptera
Psittacidae	Arao		manilata
Mustelidae	Eira		barbara
Order:	CHARADRIIFORMES
But this poses a problem (What is the problem?).
We can solve this by specifying -w to match only full words:
grep -i -w ara spawannxs.txt
Psittacidae	Ara		macao
Psittacidae	Ara		ararauna
Psittacidae	Ara		chloroptera
And also show line(s) after the one that was matched, we can use -A x, where x is number of lines to use:
grep -i -w -A 1 ara spawannxs.txt
Psittacidae	Ara		macao

--
Psittacidae	Ara		ararauna
Psittacidae	Ara		chloroptera
Psittacidae	Arao		manilata
Similarly, -B shows the lines before:
grep -i -w -B 1 ara spawannxs.txt
Psittacidae	Amazona		vittata
Psittacidae	Ara		macao
--
Psittacidae	Amazona		ochrocephala
Psittacidae	Ara		ararauna
Psittacidae	Ara		chloroptera
Use -n to show the line number of the match:
grep -i -w -n ara spawannxs.txt
216:Psittacidae	Ara		macao
461:Psittacidae	Ara		ararauna
462:Psittacidae	Ara		chloroptera
To print all the lines that do not match a pattern, use -v:
Also try grep -i -w -v ara spawannxs.txt
This will produce a lot of output (which I will not show)! What does this command do?
To match one of several strings, use grep"string1\|string2” file. grep can be used on multiple files, all files, using wildcards for filenames, etc – explore as and when you need.
Finding files
It’s easy to find files in UNIX using, well, the find command! Let’s test it (make sure you are in Sandbox, not Data!)
cd ../sandbox # again, note the relative path!
mkdir TestFind
cd TestFind
mkdir -p Dir1/Dir11/Dir111 #what does -p do?
mkdir Dir2
mkdir Dir3
touch Dir1/File1.txt
touch Dir1/File1.csv
touch Dir1/File1.tex
touch Dir2/File2.txt
touch Dir2/file2.csv
touch Dir2/File2.tex
touch Dir1/Dir11/Dir111/File111.txt
touch Dir3/File3.txt
ls
Dir1 Dir2 Dir3
ls Dir1
Dir11 File1.csv File1.tex File1.txt
ls Dir* # the asterisk wildcards names so you can find all dirs with a particular start to their name
Dir1:
Dir11  File1.csv  File1.tex  File1.txt

Dir2:
file2.csv  File2.tex  File2.txt

Dir3:
File3.txt
Don’t forget to use man to check what mkdir and touch do.
Now find particular files:
find . -name "File1.txt"
./Dir1/File1.txt
Using -iname ignores case, and you can use wildcards:
find . -iname "fi*.txt"
./Dir1/File1.txt
./Dir1/Dir11/Dir111/File111.txt
./Dir3/File3.txt
./Dir2/File2.txt
You can limit the search to exclude sub-directories:
find . -maxdepth 2 -name "*.txt"
./Dir1/File1.txt
./Dir3/File3.txt
./Dir2/File2.txt
You can exclude certain files:
find . -maxdepth 2 -not -name "*.txt"
.
./Dir1
./Dir1/File1.tex
./Dir1/File1.csv
./Dir1/Dir11
./Dir3
./Dir2
./Dir2/File2.tex
./Dir2/file2.csv
To find only directories:
find . -type d -iname *dir*
./Dir1
./Dir1/Dir11
./Dir1/Dir11/Dir111
./Dir3
./Dir2
Installing or removing software in Ubuntu
You can install software in your /home directory. In UNIX you originally had to login as root (administrator). But in Ubuntu, it is sufficient to add sudo (super user do) in front of a command. To install packages in all Debian (including Ubuntu) distributions you need to use the apt group of commands which allow you to deal with various installation (and un-installation) tasks.

Installing from the main repository
You can install anything that is in the main Ubuntu package/software repository.
★ Try installing R, which is pre-packaged the main Ubuntu repository:
sudo apt install r-base
This will prompt you for your password.
Tip
Using the tab key in terminal: Don’t forget to use the tab key in the terminal. It aut-ocompletes directory/file names for you (same in Rand Python, and/or provides a list of files in the current directory (hit tab twice after certain commands. For example, try double tab after typing lsat the bash prompt.)
Enabling additional repositories
You can enable additonal repositories that are already present (but not enabled by default) by using the Ubuntu “Software Centre” GUI. Launch Ubuntu Software Centre, and then Edit > Software Sources > Other Software (the exact approach will vary depnding on your Debian or Ubuntu distribution).
Installing from other repositories
In addition there are other repositories you can access, but which first need to be auhtenticated locally for your system’s security and stability. There are typically available in the form of Personal Package Archives (PPAs). The general approach is:
Find the repository’s web page (it’s Launchpad page)
Look for “Adding this PPA to your system” on the page. Make a note of the PPA’s location, which has the format ppa:user/ppa-name.
Open a terminal and enter:
sudo add-apt-repository ppa:user/ppa-name. (replace ‘ppa:user/ppa-name’ with the PPA’s location that you noted above)
Your system will now fetch the PPA’s key. This enables your system to verify that the packages in the PPA have not been interfered with since they were built.
Finally, download the latest list of software from each repository archive on your system (all of them: main, additional, and extra ones you have added manually such as the PPA you just added. To do this, use:
sudo apt-get update
You can now start installing software from the new repository.
★ Try installing something that isn’t in the main repository – a weather indicator.
For this, you first have to add the repository:
sudo add-apt-repository ppa:atareao/atareao
This will ask you to first approve the addition of this repository. Then, sudo apt-get update, and then, finally,
sudo apt install my-weather-indicator
Tip
Ubuntu repositories: Official Repositories are defined in /etc/apt/sources.list. You can enable or disable individual repositories by editing that file.
Installing from downloaded *.deb files
You can also install software from third-party sources by downloading an installable package archive. Such archives come with a *.deb extension.
For example, you can install Visual Studio Code this way. Let’s try it.
★ First download and install the .deb package (64-bit) from their website (google it!). This will save it to your Downloads directory.Then cd to its location:
cd ~/Downloads
This is same as typing cd /home/<YourUserName>/Downloads. Then, you can install using:
sudo dpkg -i code_1.71.2-1663191218_amd64.deb # install, including dependencies
Installing the .deb package will automatically also install the softwarre’s apt repository and authorize it. That means henceforth, the program code will automatically auto-update during the regular system updates.
Removing software
You can also easily remove software by, well, using the remove command!
You will find that the list of UNIX commands are quite exhaustive, and their names quite intuitive, as they should be. If you think a certain command with a certain name should exist, it very often does!
★ Try removing the totem video player and installing the more versatile VLC player instead:
sudo apt remove totem
and then,
sudo apt install vlc
Particularly useful UNIX tools
That’s it for our introduction to UNIX. We have just scratched the surface, but hopefully you have seen the potential for using the the UNIX/Linux terminal in particular for performing important tasks efficiently. UNIX has an incredibly wide array of commandline tools that can make your life easier. Here is a list of particularly useful commands (that often belong to a bigger toolkit; some of these will have to be installed using apt as you have learned above):
Tool |
What it does |
|---|---|
|
Find which processes are using your memory and cpu |
|
Kill processes (use with caution) |
|
Find patterns in directory and file names, as well as file contents; really useful for combining with other tools to perform operations on specific subsets of files and directories |
|
Find files and directories |
|
Convert between document formats (e.g., \LaTeX and Word or Markdown and PDF) |
|
Convert between file |
|
Manipulate PDF files, like merging multple ones or splitting them |
|
Download files from the web |
|
Sync folders on your computer, including on any atatched devices (like an external hard drive) |
|
Set up automated tasks (like run a backup script based on |
|
Keep multiple computers synced |
You will next learn to automate the use of such tools using shell scripts.
To find out more about these commands and tools, look at their man pages. You can also use whatis for a brief description, or--help after the command for usage syntax.
An of course, you can use the internet to get help on practically everything about UNIX – there is huge (and fast growing) community out there.
Practicals
Instructions
Review (especially if you got lost along the way) and make sure you can run and understand all the commands and get the expected outputs we have covered above.
Make sure you have your directory organized with
code,dataetc and the necessary files, under your coursework directory (e.g.,CMEECourseWork/week1).Along with the completeness of the practicals/exercises themselves, you will be marked on the basis of how complete and well-organized your directory structure and content is – in all coming weeks as well.
Please put (judicious) comments in all of your script files.
Bash command challenge
Here is a somewhat complicated bash command using two pipes (you are not expected to include the answer to this one as part of your weekly submission):
find . -type f -exec ls -s {} \; | sort -n | head -10
What does this command do? (Hint: try it on the test directories and files we created in sandbox)
FASTA exercise
In the directory /data/fasta you will find some FASTA files. These files have an header starting with > followed by the name of the sequence and other metadata. The sequence data start from the second line. Write a file called UnixPrac1.txt with UNIX shell commands that do the following (number each command with a hashed comment like so – #1, #2, etc):
Count how many lines there are in each file
Print everything starting from the second line for the
E. coligenomeCount the sequence length of this genome
Count the matches of a particular sequence, “ATGC” in the genome of E. coli (hint: Start by removing the first line and removing newline characters)
Compute the AT/GC ratio. That is, the (A+T)/(G+C) ratio (as a single number). This is a summary measure of base composition of double-stranded DNA. DNA from different organisms and lineages has different ratios of the A-to-T and G-to-C base pairs (google “Chargaff’s rule”). For example, DNA from organisms that live in hot springs have a higher GC content, the GC base pair is more thermally stable.
Note that there may be some Y and R’s in DNA sequences, denoting bases where there is uncertainty about identity, with R denoting purine (A or G) and Y pyrimidine (C or T) ribonucleotides. No agreed symbols exist for the other possible combinations, but these too may arbitrarily be reprsented by some non ATGC letters. To handle these, the calculation should be done by keeping these extra letters in place. That is, do not delete them before calculating the ratio, as this will shift the sequences.
Save
UnixPrac1.txtin thecodedirectory.Please make sure that each command calls the data from the
datadirectory!
Do not write any of the above as shell scripts (that’s not been covered yet; see Shell Scripting Chapter – each answer should be a single line solution made of (potentially piped together) UNIX commands.
Readings & Resources
Your University library likely gives you access to several e- and paper books on UNIX, some specific to Ubuntu. Browse or search and find a intro book that suits you.
General
If you like history, see this.
Lots of UNIX tutorials out there. Try http://software-carpentry.org/lessons.html (Chapter “shell”).
The bash reference manual: https://www.gnu.org/software/bash/manual/bash.html
Repositories and packages in Ubuntu
Read about Apt authentication in Debian Linux distributions (including Ubuntu).